Living in an area prone to severe weather 6 months out of the year (and the occasional blast of winter), a weather radio or two (or three, or four) good things to have around the house.
We have a few of the Midland WR120-EZ weather radios scattered around the house so that we get alerted wherever we are in the house.
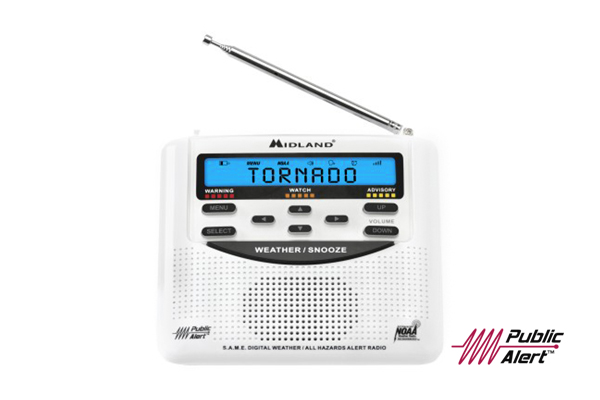
They’re not too expensive, they’re easy to program, and they don’t take up much space. We’ve given a couple of ours to neighbours, and regularly give them to friends as gifts or housewarming presents. They run off AC power with 3 AA batteries providing backup power for when power goes out or for portable use. The radio has a comprehensive list of alerts, most of which can be turned on or off. It also has SAME (Specific Area Message Encoding) codes and 7 NOAA weather radio station frequencies to select from. You can set the radio to get alerts for a single county, multiple counties, or all weather alerts.
The back of the radio has ports for an external antenna, power plug, and a cloning port (the manual has no information on how to use the cloning port). I find the built-in telescoping antenna sufficient to receive the two NOAA stations in my area. The antenna is also pretty easy to replace if you happen to accidentally break it. The telescoping antenna from Radio Shack is a perfect fit if you ever need to replace the original antenna.

When an alert is received, the WR120 produces a pretty loud alarm sound. In your average sized house, you should have no problem hearing the alarm regardless of where you are in the house. If you live in a big house and really want to make sure a weather alert can be heard anywhere in the house, you might want two or three radios.
It’s unboxed. Now what?
First thing you’ll want to do once you get the radio powered up is start programming it. Plug the wall wart into the wall and the other end into the radio. Add batteries.
The instructions in the manual are pretty easy to follow. Press the MENU button to get into the menu. The UP and DOWN buttons will cycle through the menu options, and the SELECT button will select that menu option. If you get lost, press the MENU button a few times until the display says SAVING, and that will get you back to normal operation. Then you can start over.
Setting the time
Easier than setting the time on a VCR.
- Press the MENU button to get into the menu. You should see SET TIME on the display, but if not just hit the UP or DOWN arrow buttons until you do.
- Press the SELECT button.
- Set the current time by using the UP/DOWN buttons to set each digit, and the LEFT/RIGHT buttons to move between the digits.
- Press the SELECT button when you’re done to store the time.
Turn the beeps off
If you’re like me you’ll find the beeps the weather radio makes with each button press annoying, so let’s turn that off.
- If you’re still in the menu, press the UP/DOWN buttons until you get to BUTTON BEEPS. If not, press the MENU button and then the UP/DOWN buttons to get to BUTTON BEEPS.
- Press the SELECT button, then press the UP or DOWN button until OFF is displayed.
- Press the SELECT button to save the setting
Set your location(s)
You can tell the WR120 to give you alerts for just the county you’re in, multiple counties, or all alerts.
- If you’re not already in the menu, press the MENU button.
- Press the UP/DOWN buttons until you get to the SET LOCATION menu. Press the SELECT button.
- Use the UP/DOWN buttons to select SINGLE, MULTIPLE, or ALL depending on how many places you want to get alerts from. Press the SELECT button when you get to your choice.
- If you know the SAME code for the county/counties you’re interested in, press the RIGHT button (if you don’t, look them up at the NOAA Weather Radio site). Use the UP/DOWN buttons to change each digit, and the LEFT/RIGHT buttons to move between the digits to set the SAME code.
- Alternatively, press the SELECT button to select your location by going through the list of locations starting with the country (USA/CANADA), state/province, and then county. Use the UP/DOWN buttons to scroll through the list, and the SELECT button to make your choice at each level.
- When you’re done, press the MENU button to save the settings.
Configure the alerts
Once you have the time and SAME location set, the next thing you’ll want to do is set up the alerts. Midland provides a useful alert reference chart showing the default setting for each alert and what alerts can’t be changed. The ones that can’t be changed don’t show up on the list in the radio. Since I don’t need to know about most of the alerts that default to ON (pretty low probability of icebergs here I think), I set them all off, then turn on individual alerts. The alerts I’m most interested in are for tornadoes and hurricanes. Hurricane and tornado warnings are always on, so I also turn on hurricane and tornado watches. Warnings > Watches.
- Press MENU. Use the UP or DOWN arrow key to scroll through the menu until you get to SET EVENTS. Press the SELECT button.
- Use the UP or DOWN arrow key to scroll through the events until you get to ALL OFF. Press the SELECT button. You’ll end up back at the SELECT EVENTS menu.
- Press the SELECT button again and scroll through the menu until you get to EDIT EVENTS.
- Scroll through the list of events until you get to one that you want to enable. If the alert name is too long for the display, the rest of it will start scrolling across. Lights below the display indicate if the alert is an advisory, a warning, or a watch. Press the SELECT button, use the UP or DOWN arrow key to set the alert to ON, then press the SELECT button. This will take you back to the list of events. Repeat for each alert you want to enable.
- When you’re finished, press the MENU button. SAVING should appear on the display to indicate that the settings are being saved.
Set the weather station
Now you’ll want to tell the weather radio which NOAA weather radio station to listen to. Make sure the antenna is fully extended. Sometimes it’s helpful to do this outside to make sure you’re getting good reception.
- If you’re not already in the menu, press the MENU button.
- Press the UP/DOWN buttons until you get to SET CHANNEL. Press the SELECT button.
- Press the UP or DOWN buttons to cycle through the list of 7 VHF frequencies until you hear a NOAA weather radio station. There might be more than one in your area, so select the one you get the best reception for.
- Press the MENU button to save the setting.
Now your WR120 radio is ready to go to work. Find a good spot on the counter or a shelf somewhere, plug it in, and wait for it to warn you about incoming severe weather. Press the big WEATHER/SNOOZE button whenever you want to listen to the NOAA weather radio broadcasts.
You’ll want to check on your radio every now and then. If it’s in weather radio mode, you’ll see a flashing NOAA on the display. If you see an icon that looks like a power plug or an RCA plug, that means the weather radio is only operating on AC power. If you put batteries into the radio, they’ll probably need to be replaced.