DLink DIR-655 autopsy

On the dissection table today is the old D-Link DIR-655 wifi router that kept flaking out last year.

Getting the cover off wasn’t too difficult. Two screws hidden under the rubber feet are all that need to be removed. A little bit of gentle pushing and prying undid the clips that hold the top cover on revealing the guts of the beast.

Inside a DLink DIR-655 wifi router

The inside is relatively sparse. The large black boxes at the top are the RJ-45 connectors. Based on the icon printed on the HN4843CG and HN2443CG objects below them, I’d guess they’re isolation transformers for the RJ-45s. The bits under the metal shield are probably the wifi radio-related parts.

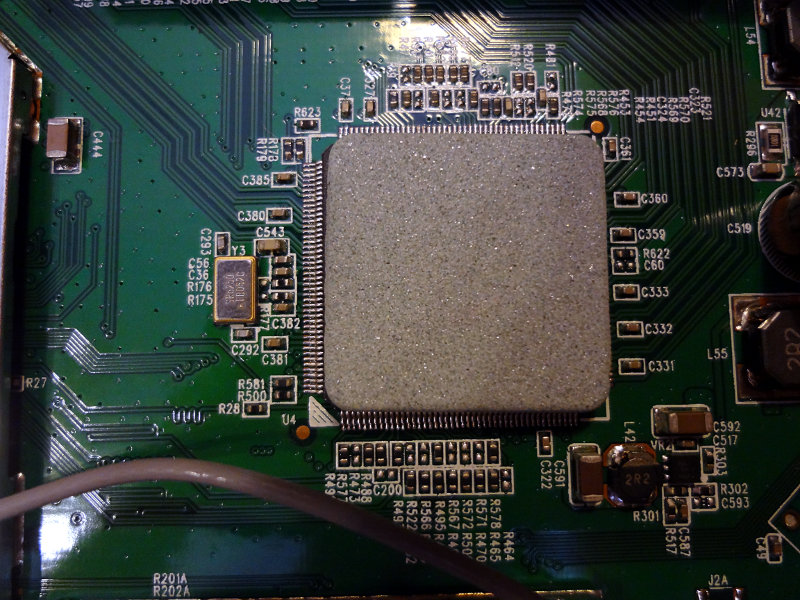
The large gray thing is some kind of stone-like substance acting as a heat sink for the large chip underneath. It’s held on by a piece of thermal tape. A little bit of prying popped it off pretty easily revealing an Atheros IC (AR 8316) which I think handles the ethernet stuff.

Gray stone-like object attached to a large integrated circuit on the main board of the DIR-655 router
Atheros AR 8316 IC

To the left of the shielded bit, the most interesting thing is an IC labeled MX25L6445EMI-10G which is a 64Mbit flash memory chip.

MX25L6445EMI-10G 64 Mbit flash memory chip

Underneath the RF shield are a few other large ICs: an Atheros AR9223 802.11b/g/n wifi module, an Ubicom IP7150U which appears to be the actual router controller and a Zentel A3R12E4JFF IC (SDRAM perhaps?).

ICs underneath the RF shield

I didn’t see anything obvious to explain why the router kept flaking out. The thermal tape holding the heatsink rock to the AR 8316 chip was mostly holding on by the edges and corners and the sticky part in the center area was shiny, suggesting it wasn’t making very good contact with the chip anymore. Overheating could certainly explain intermittent issues. Would be an easy fix with some new adhesive thermal compound and a low profile heatsink. The RF shield got mangled a bit in the removal process though, so this board is off to the workbench.

Work computer upgrades

Finally got around to replacing the work desktop (cobbled together from parts of old retired PACS display stations) with a “newer” workstation (cobbled together from parts of slightly less old retired PACS display stations).

It’s one I put together about a year ago, but just never had time to move it down to my desk. Quad core Xeon 5120, 16GB RAM and around 750GB of hard disk space spread over 4 drives. For something pieced together out of spare parts, this new computer is significantly beefier than the old one. It’s capable of driving 4 monitors, so I think I’ll have to go scrounge for a third one.

My old web/database server is being retired, so I’m moving those functions down to this new computer. Spent the day working on migrating stuff over from the old server, which went surprisingly smoothly.

Pro tip: When something should be working, but isn’t, check for unnoticed SELinux alerts. Might just find something useful there.

Nexus 5 touch screen issue

For some odd reason, my Nexus 5 has now developed this 5 mm strip along the right side where no screen touches are registered.

Screenshot_2014-08-25-08-38-31.png

Note the nice clean border where the phone thinks there’s no touch screen.

It’s not a large area, but it just happens to be where the scroll bars are positioned, and the letter ‘p’ on the keyboard. If I’m lucky, I can tap and get a ‘p’, but most of the time I end up getting an ‘o’. Depending on the application, there might be a few other controls along that strip which would be inaccessible. I also can’t drag anything to screens on the right.

I’ve established that it’s not a screen calibration issue. With the ‘Show touches’ option turned on under Developer options, the phone registers screen touches right where I tap the screen, except for that 5 mm strip along the side. This time there’s no screen protector or case getting in the way. The phone is completely naked.

I think it was on Saturday when I first noticed the odd behaviour while playing Ingress. I couldn’t get something to pop out from the right side of the screen. Didn’t think much of it because I thought maybe it was just a UI change that got snuck in. It wasn’t until I started trying to do more things with it today that I realized the dead zone was there.

Power cycling and a factory reset (after copying backups off the phone) didn’t help matters, so I think it’s time to make another call to Google tech support.

Update: After calling Google tech support, a replacement (refurb) phone is on the way. If they determine your phone can’t be fixed using their normal troubleshooting, and it’s eligible for a warranty replacement, you’re sent a link via email to the Google Play store where you “purchase” a replacement. You also get an RMA form and a return shipping label. When the replacement phone arrives, I’m supposed to box up the broken phone and send it back to Google. After the phone is received by Google and checked out, the credit hold from the purchase is removed from the credit card.

Out with the old wifi

Had to replace the wifi router (a D-Link DIR-655). It had been crashing intermittently for a while now. All of a sudden, the wifi would just disappear and the router was inaccessible even from the wired connection. Power cycling would bring it back to life though. Last night after the router dropped out several times in a 10 minute span, I decided it was time to replace it.

Fortunately we still had Connie’s wifi router on hand (a D-Link DIR-615). A slight downgrade from the DIR-655, but it works and I didn’t have to go out and buy a new one. The only significant things lost are the gigabit wired ports that the desktop is connected to, but that’s not a huge deal. I can live without those for a while.

I noticed that when I was taking the old wifi router off the pegboard that it was feeling pretty warm, so I suspect that the crashing was due to overheating.

Now I have a wifi router to play with on the workbench… 🙂

Morse code buzzer

I mashed together my Morse Blinker code with the noise making code from the Getting Started with Netduino book to make my Netduino buzz out text in Morse code.

Like the Morse Blinker program, it takes a string provided in the morseText variable and buzzes it out on the little speaker that comes with the kit. Morse code speed is adjusted by changing the beatsPerMinute variable. I haven’t done any testing to figure out how the beatsPerMinute value translates to Morse code words per minute (wpm), but a value of 500 sounds to me like something around 20 wpm.


using System;
using System.Threading;
using System.Collections;
using Microsoft.SPOT;
using Microsoft.SPOT.Hardware;
using SecretLabs.NETMF.Hardware;
using SecretLabs.NETMF.Hardware.Netduino;
namespace MorseBuzzer
{
public class Program
{
public static void Main()
{
// Text to Morse code conversion table
Hashtable morse = new Hashtable();
morse.Add('a', "a1a3");
morse.Add('b', "a3a1a1a1");
morse.Add('c', "a3a1a3a1");
morse.Add('d', "a3a1a1");
morse.Add('e', "a1");
morse.Add('f', "a1a1a3a1");
morse.Add('g', "a3a3a1");
morse.Add('h', "a1a1a1a1");
morse.Add('i', "a1a1");
morse.Add('j', "a1a3a3a3");
morse.Add('k', "a3a1a3");
morse.Add('l', "a1a3a1a1");
morse.Add('m', "a3a3");
morse.Add('n', "a3a1");
morse.Add('o', "a3a3a3");
morse.Add('p', "a1a3a3a1");
morse.Add('q', "a3a3a1a3");
morse.Add('r', "a1a3a1");
morse.Add('s', "a1a1a1");
morse.Add('t', "a3");
morse.Add('u', "a1a1a3");
morse.Add('v', "a1a1a1a3");
morse.Add('w', "a1a3a3");
morse.Add('x', "a3a1a1a3");
morse.Add('y', "a3a1a3a3");
morse.Add('z', "a3a3a1a1");
morse.Add('0', "a3a3a3a3a3");
morse.Add('1', "a1a3a3a3a3");
morse.Add('2', "a1a1a3a3a3");
morse.Add('3', "a1a1a1a3a3");
morse.Add('4', "a1a1a1a1a3");
morse.Add('5', "a1a1a1a1a1");
morse.Add('6', "a3a1a1a1a1");
morse.Add('7', "a3a3a1a1a1");
morse.Add('8', "a3a3a3a1a1");
morse.Add('9', "a3a3a3a3a1");
morse.Add(' ', " ");
morse.Add('.', "a1a3a1a3a1a3");
morse.Add(',', "a3a3a1a1a3a3");
morse.Add('?', "a1a1a3a3a1a1");
morse.Add('!', "a3a1a3a1a3a3");
morse.Add('/', "a3a1a1a3a1");
// Hashtable to store the notes
Hashtable scale = new Hashtable();
scale.Add("c", 1915u);
scale.Add("d", 1700u);
scale.Add("e", 1519u);
scale.Add("f", 1432u);
scale.Add("g", 1275u);
scale.Add("a", 1136u);
scale.Add("b", 1014u);
scale.Add("C", 956u);
scale.Add("D", 851u);
scale.Add("E", 758u);
scale.Add("h", 0u);
// Text to play in Morse code. Change this to whatever you want
string morseText = "ab4ug";
int beatsPerMinute = 500;
int beatTimeInMilliseconds = 60000 / beatsPerMinute;
int pauseTimeInMilliseconds = (int)(beatTimeInMilliseconds * 0.1);
PWM speaker = new PWM(Pins.GPIO_PIN_D5);
while (true)
{
foreach (char c in morseText)
{
// Get the Morse "song" corresponding to the current letter
string song = (string)morse[c];
for (int i = 0; i < song.Length; i += 2)
{
// Extract the note from the string
string note = song.Substring(i, 1);
int beatCount = int.Parse(song.Substring(i + 1, 1));
uint noteDuration = (uint)scale[note];
// Play the note
speaker.SetPulse(noteDuration * 2, noteDuration);
Thread.Sleep(beatTimeInMilliseconds * beatCount - pauseTimeInMilliseconds);
// pause for 1/10th of a beat
speaker.SetDutyCycle(0);
Thread.Sleep(pauseTimeInMilliseconds);
}
// Pause for one beat between each character
speaker.SetDutyCycle(0);
Thread.Sleep(beatTimeInMilliseconds);
}
// Pause for five beats before repeating
speaker.SetDutyCycle(0);
Thread.Sleep(beatTimeInMilliseconds * 5);
}
}
}
}

The latest version is over in my Github. I’ll probably spend some time redoing Morse code translation table to make changing the tone easier.