“Show me”
This has been running through my head a lot lately as I’m learning more letters. I’m up to 10 letters plus the numbers now.
.-
.
….
..
-.-
…
…
…-
..-
I need to get some practice hearing and then translating.
Perspectives of a Canadian in the Old/Deep/New/Geographic South: This is where I ramble on about nothing in particular and post a few nice pictures.
Amateur radio posts
“Show me”
This has been running through my head a lot lately as I’m learning more letters. I’m up to 10 letters plus the numbers now.
.-
.
….
..
…
…
…-
..-
I need to get some practice hearing and then translating.
After spending the last couple of “spare time” months looking at the material for the amateur radio Extra class exam, I decided it was time to take a more intensive approach. The past week I’ve been spending whatever time I can grab reviewing questions and material, taking practice tests and stuffing more radio material into my brain. I’m having to dust off all the old electronics knowledge I used to have (but never really put to use). The question pool for the Extra test has a lot more questions on electronics and circuits than the Tech or General question pool.
I’m making pretty good progress, and am getting to the point where I’m consistently getting a passing score or very close to a passing score in the practice tests I take. CARS has a testing session this coming weekend (Oct 13) and my goal is to be ready by then to take the test.
The kit I built has been pretty fun to play with, and I’ve got about 6 letters so far that I remember the code for and what letter it represents. There are a few more codes where I have to think about what letter it represents. I’ll be able to start testing myself by listening to some code and trying to interpret it.
In the meantime, I thought it would be cool to start experimenting with the basic kit. Stopped by Radio Shack yesterday and was able to find all the circuit components and a breadboard to recreate a second key. The plan is to lay out the key on the breadboard and get it working, then experiment with some mods. First mod I’d like to try is to insert an LED that lights up when the key is pressed so that it blinks as well as beeps. Then maybe add some volume control. I think there’s a good bit of room for playing with the kit.
I’m also going to need some parts bins for the workbench.
This past weekend, the radio’s GPS and APRS got tested out on a road trip to the Chattanooga, TN area.
The GPS works pretty well. Takes a few minutes to lock onto the satellites after turning the radio on, but once it locks it tracks well. The radio displays latitude/longitude, speed, direction and altitude. It’s neat watching my GPS coordinates update while driving down the highway.
APRS worked well, but I’m discovering that at 5 watts of transmitting power, the APRS holes are pretty big. Receiving APRS beacons from other transmitters was pretty easy. Getting my own APRS beacon out and received was harder. With my radio in the car with me on the way out to Chattanooga, it beaconed pretty well in the Charleston area, and again in Columbia, but after that nothing. On the way back to Charleston, I was able to connect my radio to Connie’s mag mount antenna on the trunk of the car. Outside of the big metal cage that is the car, I was able to receive even more APRS beacons from other stations. Getting my own beacons out was also noticeably easier. My radio beaconed a lot more on the way back with the mag mount antenna than it did on the way out. It was still pretty sporadic and the holes were still pretty big, but a definite improvement over trying to transmit through a big metal cage.
Thanks to a stop at Ham Radio Outlet in Atlanta, I now have my own dual band (144/440 MHz) mag mount antenna (an MFJ-1729 mag mount kit) mounted to the trunk of my car. Now I should have a much longer range on the radio when I’m in the car. Help me test it out. I’m usually listening on one of the CARS repeaters. Give me (KK4JRP) a call on the radio!
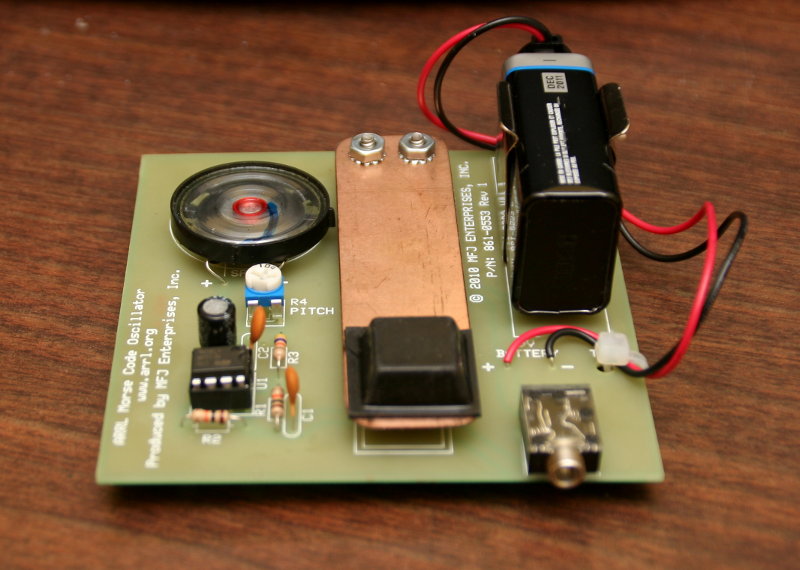
I’ve managed to successfully build my first electronics project since the light box I built back in Industrial Arts class in Junior High school.
After seeing one of these Morse code key kits at the Dragon*Con ham radio table I helped out with, I decided they were pretty cool and that I should try to build one. Just the thing I need to help me learn and practice Morse Code/CW.
It’s a pretty simple kit without a whole lot of components. Everything’s all made up, so it’s just a matter of sticking the right electrical bits into the proper holes and soldering them into place. It’s been a long time since I soldered anything. I practiced a little bit on some old laptop power supply parts I had laying around, then went to work on the kit. The inexpensive soldering iron I picked up at Radio Shack a while ago did an ok job, although it seemed like it took a while to heat things up enough to melt the solder. Fortunately the solder stayed in the places I wanted it to be and I didn’t make any short circuits.
I also put my Cold Soldering iron to work on a few parts, which actually worked reasonably well while the tip lasted. Because of the gap it uses in the soldering tips, the cold soldering iron works fine for large things, but is ineffective for small soldering jobs.
Total time was maybe 2-3 hours. If you’re good at soldering, it’s something that could easily be assembled in an hour or less. My soldering isn’t great, but everything works. Kind of tempted to get another one…maybe lay it all out on a breadboard and experiment with modifying it.